Guitar Fundamentals

Introduction
As a visitor to this website you have spent a long time checking other guitar lesson sites and came here to see if it has information valuable to you. As someone interested in learning how to play guitar whatever level you may be at currently, you want information that will get to the point. Will this website provide me with information to learn how to play guitar in a reasonable period of time! The answer to that question is that it depends because there are some things you have to know to help you with the process of learning how to play guitar. There are 7 categories that you need to know that will help you learn how to play guitar from the beginner to the advanced level. They are:
- Knowing the parts of your guitar
- How to tune your guitar
- How to hold your guitar
- Finger Movement
- How to Hold a Guitar Pick
- How to Read Guitar Chords
- Strumming without a pick
Knowing the Parts of your Guitar
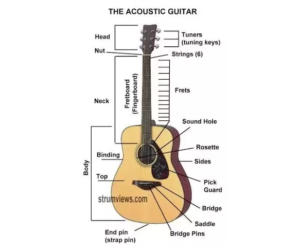
Below is a diagram of an acoustic guitar and if you have an electric guitar the parts are usually the same. To learn how to play guitar you need to obtain one and learn its physical part to understand how to use it. The diagram below identify 11 parts of a guitar. It’s important to a beginning student of guitar to know the names and their functions.
- Head : It is the flat platform like area at the end of the neck, which is used for the placement of the 6 tuning keys. The angle at which the head is attached to the neck determines how long the notes sound.
- Tuners : The knobs which adjust the pitch of the strings to match the desired tuning. It gives you the ability to easily adjust the tension on the string which can significantly affect the performance of your guitar.
- Nut : It is a skinny piece of material usually made out of bone, plastic, brass or graphite with slots in it where the strings cross. It sits between the head and the fretboard and keeps the strings in place. Also, it transmits vibration to the neck of the guitar and as a result, affects the tone of the guitar.
- Neck : It is the long thin piece of wood between the head and body, which holds the head, nut, fretboard and frets and truss rod. The quality of wood, shape and connection of the neck to the body affect the sound of the guitar. The neck is usually attached to the body by either bolts or glue or sometimes both.
- Strings : The strings of an acoustic guitar are different than electric guitars. Classical guitars have nylon strings and regular acoustic guitars have metal strings. The thickness and composition of the strings make a big difference in sound. There are six strings on an acoustic guitar from thickest(top)to thinnest (bottom)called E, A, D, G, B, E.
- Frets : The metal strips that run across the fretboard. It is the spaces between the metal strips (fretbars) that are inserted into the fingerboard You place your fingers behind them and press down while striking the string to produce a note.
- Fret markers : The markings on the fretboard let you know where you are on the fretboard and help you from getting lost. They identify specific frets so the performer can see the neck position. On guitars, fret markers are found on the 3rd, 5th, 7th, 15th, 17th and 19th
- Body : It is the resonance chamber where the sound bounces around inside and comes out the sound hole. It is made up of soundboard on the top and sides. There are 11 types of wood from Alder to walnut that can be used to construct the body of the guitar.The type of wood, design and craftsmanship make the difference in the sound.
- Sound hole : The hole in the body, where the sound comes from.
- Bridge : The bridge is where the strings are anchored to the body. Vibration is transferred through the bridge and vibrates the body to produce the tone that is unique to the guitar.
- Bridge pins : Pins that hold and anchor the string in the bridge of the guitar. Bridge pins come in various sizes and can be made from plastic, wood, ivory, bone, and even brass. Each material provides a different tone and offers varying degrees of longevity.
How to Tune Your Guitar
Learning how to tune a guitar is a process you need to learn as a student before you play a tune or a song. Professional musicians and guitar teachers do this step every time because it helps them train their ear to the correct sound. If you simply grab your guitar and start playing without tuning it you are teaching your ear to hear the wrong sound. It will also slow your progress as a guitarist because you won’t be able to know or hear if the guitar is out of tune and identify which string is causing it. The goal is to train your ears to know if that interval or note or chord to sound is different from it is supposed to. By keeping your guitar in tune you will enjoy playing songs on it and get the most of your guitar practice sessions.
A well tuned guitar will sound better and will be enjoyable to play. You will have a lot more fun playing the guitar, spending more time with it whether you are engaged in a practice session with your instructor or playing a song by yourself. This process will create good learning habits and will improve your skill in mastering the guitar
The Tuning Process
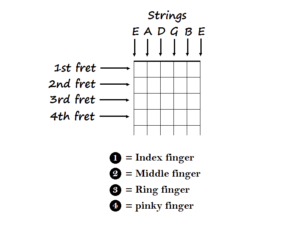
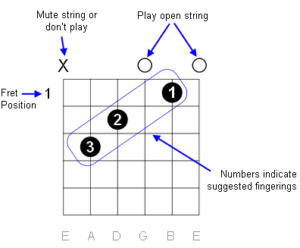
The first method you are going to learn is to tune an acoustic guitar using the Standard Tuning approach. Below is an illustration of a chord map or chord box. It shows the six strings thinnest (left)to thickest (right)called E, A, D, G, B, E. To the left of the strings are the frets and below it are the finger positions
How to remember the notes of the guitar strings
Here’s two useful mnemonics to help you remember the order “E, A, D, G, B, E”.
- Elephants And Donkeys Grow Big Ears
- Eddie Ate Dynamite Good Bye Eddie
You can pick whatever mnemonics that you like the best
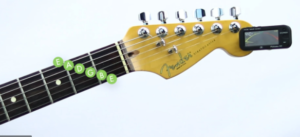
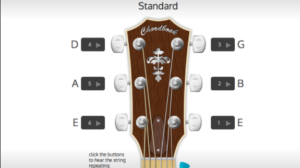
Below is a picture of the head of an acoustic guitar with 6 tuning keys. You can start the process by tuning the thinnest string E (6) to the thickest E (1).
FAT E – 6TH STRING
Tune the low E string to your reference note, adjust the pitch up or down until they are in agreement.
A – 5TH STRING
Next, tune your A string by playing a note at the 5th fret of the E string, adjust the pitch up or down until they are in agreement.
D – 4TH STRING
Next, tune your D string by playing a note at the 5th fret of the A string, adjust the pitch up or down until they are in agreement.
G – 3RD STRING
Next, tune your G string by playing a note at the 5th fret of the D string, adjust the pitch up or down until they are in agreement.
B – 2ND STRING
For this string there is a slight change, tune your B string by playing a note at the 4th fret of the G string, adjust the pitch up or down until they are in agreement.
E – 1ST STRING
Next, tune your E string by playing a note at the 5th fret of the B string, adjust the pitch up or down until they are in agreement.
Tuning an Electric Guitar
There are a number of ways that you can tune an electric guitar. The first approach which is called standard tuning is based on using your ear to adjust the tuning keys to understand pitch and harmony. Standard Tuning was discussed in detail in the previous section so we will concentrate on the other methods of tuning your electric guitar.
Although some of these methods are specific to electric guitars, most of them can also be used to tune an acoustic guitar!
How To Tune An Electric Guitar
- Tune By Ear.This is the way all guitarists should learn before turning to an electric tuner. Learning to tune by ear is a valuable experience that will serve you well throughout your guitar career. Please see previous section.
- Microphone Based Tuner.These electric tuners pick up the sound of each string via a microphone. They have a basic interface and a display that clearly shows how close your string is to be in tune.
- Vibration-Based Tuner.These tuners are perfect if you are tuning an electric guitar in a noisy or busy place. Vibration-based tuners are very common among guitarists and come in various shapes and sizes.
- Plug-in/Pedal.These electric tuners are often found on stage alongside a variety of more fun and exciting pedals. A plug-in/pedal tuner is the perfect tuner for gigs and studio environments.(Source: https://play-guitars.com/tune-an-electric-guitar/)
How to tune a guitar using a smartphone app.
There are about 7 billion smart phones on Earth and you can get an application software for almost any kind of topic or interest.
Smartphone apps are a low cost and affordable approach in learning how to tune a guitar.
There are hundreds of free and for pay smart phone apps that function well. However each student should evaluate them based on user comments. First generation app are known to have bugs in their software code and can lead to unhappy user comments. Apps that tune guitars operate similarly to microphone-based tuners.
How to Hold Your Guitar
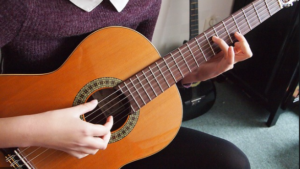
Learning proper guitar posture is an important when you are learning how to play guitar. Whether you are sitting or standing, good guitar posture helps you play your guitar comfortably for a specific period of time while avoiding pain or strain for as long as possible.
However, if you don’t learn proper guitar posture you are at risk for strain and injuries. Guitar players can experience back, shoulder, neck, arm and wrist pain. This is called repetitive strain injury (RSI) because when you are playing your guitar in the same posture over a long period of time you may experience pain in the affected area, but not at the same time. For example you may have back strain sitting in a chair with no back as opposed to one that does. This is due to the fact that while you are playing your guitar your back is arched and it may get sore after a period of time. You may also develop tendonitis which is the inflammation of the muscle such as the arm or elbow. Lastly you can also get carpal tunnel syndrome (CTS) which is nerve damage in the wrist. It feels like a pinched nerve when you play your guitar and you lose feeling in it when you pick up objects. In extreme cases medical doctors who are specialist may recommend surgery, but that could result in limited movement of the wrist.
Every guitar player or aspiring student will face possibility of the above mentioned injuries, but learning proper posture techniques can prevent them and create a better experience
Below are best practices for proper posture techniques
Sitting position
Sit down on a chair, put your two feet on the floor and keep your back straight. Put the waist of the guitar on your right leg (if you’re right-handed) and hold the back of the guitar against your stomach and chest. Keep the neck of the guitar horizontal to the floor. Put your elbow in front of the ridge of the guitar so that your right arm should be over the strings in front of the bridge.
Do not sit on a stool chair (puts strain on your back), or arm chair (it restricts your arm movement), but sit on chair without an arm.
Left hand position and finger placement (fretting hand)
The thumb of your fretting hand should rest behind the neck of the guitar placing it approximately between your first two fingers. Make sure to bend all your knuckles (1st, 2nd and 3rd).
Use your finger tips to press down on the strings and keep them close to the fret as possible. Keep the fingernails short by filing them down so they don’t touch the fret-board.
Right hand position (strumming hand)
Rest your upper right arm on the upper part of the guitar body, your right hand floating comfortably above the sound hole and relax your arm, wrist and hand.
Strumming technique
There are several strumming techniques for guitar playing. Here is one that is commonly used: Place your thumb against your index finger and hold them like that. This gives you a decent support. Bend your middle, ring and pinky slightly towards the palm of your hand so it is comfortable to use.
You can move the right hand down (down strum) with the nail of your index finger against all the strings (E, A, D, G, B, E) and then up strum with the nail of your thumb. You can play with your index finger and thumb separately which gives you a more tender sound.
Using a pick
Hold the pick with the right hand between your thumb and index finger. Place the pick on the top side of your index finger and clamp your thumb down on top of it. Hold the pick firmly.
Fingerpicking position
Rest your forearm on the top front edge of the lower bout to stabilize your hand. Hold your hand above the sound hole, make sure your hand and arm is aligned and bend your knuckles slightly.
The most common used approach is playing the bass strings (4th, 5th and 6th string) with the thumb, 3rd string with the index finger, 2nd string with the middle finger and the 1st string with the ring finger. Other variations are also used. Use the tip of your fingers to play the strings.(source: https://www.guitarhabits.com/how-to-hold-a-guitar-proper-posture-and-hand-positioning/)
Prevent injuries
It’s important to keep you back straight to align your spine. You also need to relax your neck and shoulders. Do not tense up, relax your arms, wrists, hands and fingers because it allows you to be comfortable when you start playing the guitar.
You can also take a break from your guitar playing and stretch your back, release tension in your neck and shoulders. If you are experiencing strain or any kind of pain, stop playing immediately and resume when your body is fully rested or the inflammation is gone.
Make sure that you get plenty of rest, sleep 6-8 hours/day, eat healthy and set up a regular exercise schedule for the week.
Learning proper guitar posture is an important when you are learning how to play guitar. Using the above mentioned best practices for proper posture techniques will help you avoid injury and help you enjoy playing the guitar
Finger Placement
Chord Fingering:
- 1 = Index Finger
- 2 = Middle Finger
- 3 = Ring Finger
- 4 = Little Finger (Pinky)
- T = Thumb
Understanding guitar chords is the most difficult part of learning how to play guitar. The above mentioned chart is a visual graphic of where to place your finger when playing the guitar
The horizontal line at the top of the guitar is the nut of the guitar where the head meets the fingerboard. Each subsequent horizontal line below it are frets.The six vertical lines represent a string, from left to right E, A, D, G, B, E or using mnemonics Elephants And Donkeys Grow Big Ears.
When you are holding the guitar using the proper posture position you are ready to play. When you play you will hit the Low E string which is closest. When you strum downward with your right hand, you will hit the A,D, G,B and the last string the high E
The diagram above you will see three black dots which indicates that you will need to press down on three strings. They are the A, D and B string between the first and second fret. The numbers at the bottom of the chart tells you which fingers on your left hand that you need to use to hold down the strings. Your left hand fingers are numbered one through 4 starting with your index finger.
Putting it together! Place your middle finger on the second fret of the D string, your ring finger on the third fret of the A string and your index finger on the first fret of the B string. Always use the tips of your finger so you don’t mute any strings. Play the open strings from the G and E .Strum slowly from A string down one note at a time, make sure that you are fretting each note clearly. Congratulations you just played a C Chord. If you placed the little finger (4) on the third fret of the G cord, they you just played the C7 chord(https://takelessons.com/live/guitar/finger-placement-guitar-chords)
How to Hold A Guitar Pick
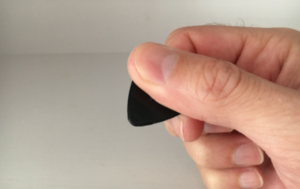
Learning how to hold a guitar pick is a very important step in learning how to play guitar. If you learn this technique improperly it will significantly hamper your musical journey. If you hold one too tight in you hand it can cause cramping. If you hold a pick too loose, it will wiggle when you play the strings in a guitar and could fly out of your hand. Its important to outline best practices in holding a guitar pick so you can enjoy using it
The first thing you need to do is to purchase a number of guitar picks. Guitar picks used to be made of Tortoiseshell from the early part of the 20th century (1900), but due to the fact that the mammals are now an endangered species, it is now banned. Now they are made of plastics such as Nylon, Celluloid or Delrin. Other material used include wood, metal and stone.
Normally, thinner picks are better for strumming, while thicker picks are better for base or lead electric guitar. There are also medium weight picks that are not too flexible or ridged to so they can catch the strings while playing.
Guitar picks are not a very expensive product on the market and it’s a good idea to buy them in quantity and variety. This will allow you to experiment with different materials and thickness of picks to find the right one that feels comfortable for you.
Once you’ve got your picks, make sure your strumming hand(right hand) is relaxed. Gently put your index finger and thumb together then close your other three fingers toward your palm.
Simply slide the pick in between the thumb and the outer edge of the index finger, so that the index finger is pointing down toward the tip of the pick without poking out beyond it
There needs to be a solid amount of pressure from the right thumb on top of the pick to keep it from shifting while playing-if you are strumming, you’ll want to have a larger portion of the pick exposed. Less exposed pick surface can give you better accuracy to hit single notes.
Now that you have the pick in the proper position in your right hand you are now ready to start playing on the guitar.( https://www.fender.com/articles/how-to/get-a-grip-how-to-hold-a-pick)
How To Read Guitar Chords
Learning how to read guitar chords is among the most important steps in playing the guitar. Guitar chords are a visual graphic representation of how you position the fingers of your left hand on the strings on the fret. The combination of your 4 fingers allows you to play notes depending on what open string that you play with your pick on the right hand. Below is a visual graph of the fundamentals of guitar chords.( https://en.wikipedia.org/wiki/Minor_chord)
How to remember the notes of the guitar strings
Here’s two useful mnemonics to help you remember the order “E, A, D, G, B, E”.
- Elephants And Donkeys Grow Big Ears
- Eddie Ate Dynamite Good Bye Eddie
You can pick whatever mnemonics that you like the best
When you are holding the guitar using the proper posture position you are ready to play. When you play you will hit the Low E string which is closest. When you strum downward with your right hand, you will hit the A,D, G,B and the last string the high E
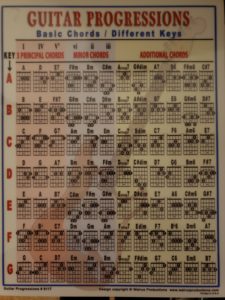
Guitar Chord Progression Chart
The chart below shows you basic chords and different keys. They consist of 3 principal chords, minor chords and additional chords. A good analogy is a paragraph in English. When you string several sentences together you get a paragraph and the approach is exactly the same for guitar chord progressions. If you string chord progressions you will get a verse to a song and you can build more complex variations
Chord progressions with roman numerals is called the Nashville numbering system. The system notes the scale degree on which a chord is created. The I is the root, the IV is the fourth note in a scale, and V is the fifth note in a scale. The progression acts as a template and lets the musician or song writer create a rhythm.
The I, IV, V, I (one-four-five-one) progression can be heard in a lot of of today’s popular music. Each progression can be played in any key, which allows for endless combinations and sounds. Lowercase roman numerals are utilized to denote minor chords.(source: https://takelessons.com/live/guitar/guitar-chord-progressions-z01)
What are Principal Chords
The I, IV, and V chords on the Guitar Progressions Charts are the three most used chords in each major key. Aloud you would call them, “The one, four, and five chords.”
The I chord is built on the first note of the key. The IV chord is built on the fourth note of the key. And, the V chord is built on the fifth note of the key.
When we use simple triads (see chords) in a major key, all three of these chords are major triads. https://www.studybass.com/lessons/harmony/the-i-iv-and-v-chords/
The primary chords of Western music are the “major triad” and the “minor triad.” Per their names, these are three-note chords built on specific degrees of a major scale and a minor scale, respectively.
What Are Minor Chords
Major chords tend to have a happier and brighter sound that you would find in rock and roll and popular music composition. Minor chords generally provoke an emotion of sadness such as you find in songs about love and romance or fear and anticipation in a dramatic or suspense music score.
What are Additional Chords
Seventh Chords and Beyond
If you want to use four-note chords and beyond, you’ll need to add a scale degree that isn’t a root, third, or fifth. The most common four-note chord is the seventh chord, where the seventh scale degree is added to a major or minor triad. There are three main types of seventh chords:
- Major seventh chord. This takes a major triad and adds the seventh degree of the major scale. You notate a C major seventh chord as C maj 7, CM7, or even C△7. Its notes are C – E – G – B.
- Minor seventh chord. This takes a minor triad and adds the seventh degree of the minor scale (aka the flat seventh). You notate a C minor seventh chord as Cm7 or
- Seventh chord (sometimes called a dominant seventh chord). This combines a major triad with the seventh degree of a minor scale. That means it has a major 3rd but a minor 7th. It’s probably the most common of the 7th chords, and a C seventh chord is simply notated C7. Its notes are C – E – G – Bb.
There is one more type of seventh chord—the “minor major seventh chord.” It’s the opposite of a regular 7th chord in that it has a minor third but a major 7th. You’d notate C minor major seventh as Cm(maj7). Its notes are C – Eb – G – B. This type of chord is rarely used, but it’s sometimes heard in twentieth-century suspense music, like in a cheesy spy movie or the broadcast TV version of Batman.
( Source: https://www.masterclass.com/articles/music-101-what-is-a-chord-learn-the-difference-between-major-chords-vs-minor-chords#what-are-the-basic-chords
Essential Chords
https://www.masterclass.com/articles/music-101-what-is-a-chord-learn-the-difference-between-major-chords-vs-minor-chords#what-are-the-basic-chords
Essential Chords
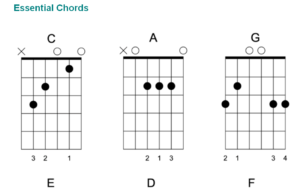
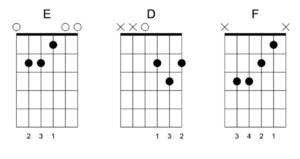
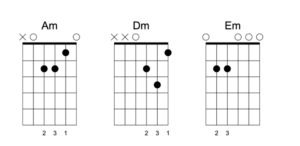
The above diagrams of 9 chords are critical for the beginning guitar student. Most of the chords are not difficult to learn except maybe the F and the minor chords. It will take some time to learn them (usually less than three months) but they are essential because they will help you build songs and allow you to play them.(source: . (https://www.libertyparkmusic.com/read-guitar-chord-diagrams/)
Strumming Without A Pick
A valuable technique that you can develop as a beginning guitar student is the ability to play without a pick. Guitar legends in the rock and roll music world have developed legendary techniques on the guitar without a standard flatpick.
When it comes to strumming the guitar there is no right or wrong approach, it’s just that there are a lot of techniques and find one that works for you and produce the sound that you want. The techniques are based on personal styles of famous guitar players, or better yet a rhythm style.
Technique #1- Strum With Your Thumb
One of the best ways to start playing without a pick is strumming with your thumb. First, you have to get the angle of your thumb right. Second, you have to try to keep your thumb parallel to the strings and try to come in at a slight angle. The goal is to make sure that your finger does not get caught on any of the strings. This technique will take some time to master until it becomes automatic.
Technique # 2-Strum With Your Index Finger
The second approach switches from your thumb to the index finger. First you strum the downstroke with your nail and upstroke with your finger. This technique will take some time to master until it becomes automatic.
Technique #3-Strum with Your Thumb and Index Finger.
In the third approach you combine techniques 1&2 and it sort of in reverse. Now you play the downstroke with your thumb and upstroke with your index finger. The aim is to create a sound that does not come from a pick and that is more balanced.
Technique #4-Holding Your Fingers Together Like a Pick
This technique require you to put your thumb and index fingers together similar to holding a pick. Next you need to create an X pattern by extending your thumb a bit beyond the index finger. Your index fingernail plays the down stroke while the thumbnail covers the upstroke. The goal is to create a sound as if you are using a pick to create a brighter sound.
Technique #5- Adding Bass Notes including a Backbeat
A common approach used in popular, country and folk music songs is to combine bass notes with strumming. The strumming is done with the index finger playing the down and upstrokes. Also, on beats 2 and 4 there is a slight accent. This is done by lightly dropping the finger-picking hand on the strings, which causes the strings to be pushed down and hit the frets on the fingerboard. This percussive slap creates a cool backbeat groove(source: https://www.premierguitar.com/5-ways-to-strum-without-a-pick)
In conclusion strumming without a pick is an important skill to learn as a beginning guitar student as well as intermediate and advanced level players. Guitar legends in the rock and roll music world have developed legendary techniques on the guitar without a standard flatpick. When it comes to strumming the guitar there is no right or wrong approach, it’s just that there are a lot of techniques and find one that works for you and produce the sound that you want.
The 5 above mentioned techniques will help you learn how to strum your guitar better and will allow you make different kinds of sound or tones when playing songs.
Beginners Course Modules 2-5
Level 1-Module 2: Learning Your A&D Chords
Now that you have been through your guitar fundamentals, it’s time to learn chords and it is a very important part of learning how to play guitar. If a beginning student learns this step properly,it will make the progress to the advanced and intermediate levels much easier and more enjoyable.
The D Chord is one of the most common chords of all (especially when you refer to the Guitar Progressions chart). You have to know this chord if you want to play guitar. This chord is very difficult for beginners to play because your fingers are not bunched together and has to be placed in the split formation. You also have to read the chord chart to see which strings that you are not to play (usually identified by the X)
The goal is to learn how to play the chord correctly and the time required to get it right will take around 2-4 weeks of regular practice.
When it comes to playing the A chord it is much easier because your finger position is grouped together usually on one fret. However, you still have to practice regularly to master it.
The F chord is notoriously difficult for the beginning student so it will take a significant period of time to master it. Most guitar teachers generally advise students to skip songs with an F chord for at least 30 days.
In general it will take the beginning guitar student 4-6 weeks (up to two months) to master simpler chords like Em, G, Am, D and C. When the student reaches this stage they should have develop enough precision in their third finger that they can play the F chord without too much difficulty. For adult learners, they should play the Fmaj7 chord because it sounds great (used in popular music scores) and easier to play than a full F chord.
-Learning How to Play the D Chord
-Learning How to Play the A Chord
-Learning How to Play the F Chord
Level 1-Module 3: Learning Your E Chords
Now that you have been through your guitar fundamentals, it’s time to learn chords and it is a very important part of learning how to play guitar. If a beginning student learns this step properly,it will make the progress to the advanced and intermediate levels much easier and more enjoyable.
The E Chord is among the most fundamental of all and its usually called E Major. You can hear it in many styles of music, but commonly used in blues and rock&roll.
The E major chord is not extremely difficult to play like the F chord. It is considered a chord of medium difficulty and you can apply strumming techniques to play all 6 strings
Beginning guitar students will find learning how to play the E chord challenging as they have to play with 3 fingers to learn finger dexterity and accuracy quickly.
E Chord Techniques
-Two Finger Approach
-1 Finger Approach
– 2 Finger E5 (E Major) Approach
– 3 E Note Approach
Module Summary
-Learning How to play the E Chord
-E Chord techniques
-Strumming Techniques
Level 1-Module 4: Learning Your Minor Chords
Now that you have been through your guitar fundamentals, it’s time to learn chords and it is a very important part of learning how to play guitar. If a beginning student learns this step properly,it will make the progress to the advanced and intermediate levels much easier and more enjoyable.
The E minor chord is one of the most common minors to play and easiest to learn. It only requires two fingers.
The technique
First take a look at the guitar chord chart and place the middle finger on the fifth string of the second fret.
Second place the ring finger on the fourth string of the second fret.
Third, strum with your right hand all six strings
Level 1-Module 5: Learning Your D Minor Chord
Now that you have been through your guitar fundamentals, it’s time to learn chords and it is a very important part of learning how to play guitar. If a beginning student learns this step properly,it will make the progress to the advanced and intermediate levels much easier and more enjoyable
The D minor chord (Dm) is a chord that creates an emotional sense of drama, suspense, dread which is used in movie or TV show soundtrack. Typical in minor chords Dm creates a feeling of seriousness and creates an atmosphere of drama.
The D minor chord is an important part of Guitar Progressions chart and critical in the make up in scores from popular to rock & roll music. It’s also not a very hard chord to learn so a beginning guitar student should master it in a short amount of time. The Dm is made of three chords D, F and A.
Finger Stretching
Playing the guitar whether you are a beginner or expert can cause strain and discomfort. Most people generally play their guitar without a strap, but for those that do it can rub against your skin on your neck and cause redness. You may experience strange feeling in your left hand when you hold the guitar between the neck and head which could over time result in repetitive strain injury or carpal tunnel syndrome. Your right arm and joints over the bridge could hurt if you are playing for a certain period of time Clearly there is a need for techniques to reduce finger strain buy employing exercise programs.
To prevent strain in your hand we need to engage in finger stretching exercises. This will improve the flexibility in your hands and forearms and promote better circulation.
In general there are 5 techniques. They are:
- Rolling Fingers
- Clenching your fist then spread them wide
- Put hands in prayer position in front of your chest then use the left hand to pull the right hand back gently. After a time do it in reverse order with the right hand GENTLY pulling back the left hand and back.
- Hand and forearm massage.
- Once you pick up the guitar, here are a few finger stretches for guitar that you can use to improve your “wingspan” (how far apart your fingers can spread), and increase your reach across the frets.( source: https://nationalguitaracademy.com/finger-stretches-for-guitar/2/)
Using the Metronome

If you remember your childhood say going back to between grade 6-8 you might have noticed that before the class learns and sings a song the teacher uses a triangle shape device that had a metal arm that swings back and forth to get everyone to keep a rhythm. This device is called a metronome and it was initially based on the pendulum that was invented by Galileo in the 16th century. In the 19th century a German inventor Johann Maelzel manufactured a line of patented metronomes called the Maelzel Metronomes
In fact the famous classical music composer Ludwig Van Beethovan from Germany used the metronome to compose his first 8 symphonies.( source: https://beginnerguitarhq.com/metronome/)
Do you really Need a Metronome?
Yes you do for the following reasons:
- It helps improve your timing. It won’t make you perfect, but it will help you to become good at noticing a rhythm.
- You can adjust to a slow or fast tempo.
- The metronome is very small and mobile and you can take it anywhere.
- You can use it to play with any song, piece or any category of music
- It will help you to be a better player and if you are in a band synchronize the tempo or beat with other players naturally.
How to Use a Metronome for Guitar Lessons:
- Understand how to use the metronome. First know how to set your tempo, say 120 beats/ minute. That means that it will click 120 times in a minute. Some songs have specific beats per minute so it’s important to know how to set the metronome.
- You can alternate your picking speed with a metronome.
- Monitoring your chord transitioning speed with the metronome while strumming.
- Lock in the rhythm of your song
- Practice your rhythm while playing a song without using a metronome.
- Use alternatives to a metronome such as electronic devices that simulate a beat.( Source: https://www.uberchord.com/blog/5-ways-to-use-the-metronome-that-will-change-the-way-you-play-guitar/)
–Learning the D Minor Chord
-Learning Finger Stretching
-Using the Metronome
Level 1-Module 6: Learning Your C Minor Chord
Now that you have been through your guitar fundamentals, it’s time to learn chords and it is a very important part of learning how to play guitar. If a beginning student learns this step properly, it will make the progress to the advanced and intermediate levels much easier and more enjoyable.
The C minor (Cm)chord can be found in a number of rock, country,new country, classical and r&b notably urban funk music. The chord when played in a song can evoke emotions of passion or longing. It is heavily used in ballads in which someone who expresses love to another person and is not reciprocated, which is reflected in songs that sound somewhat depressing.
– It can be a difficult note to play due to the positioning of the fingers
-The notes that make up the C minor is C, Eb and G
-Guitar teachers generally advise beginning students to play the C minor alternative. They can place their finger on the three bottom strings E,B,G which is easier.( source: https://www.fender.com/articles/how-to/learn-how-to-play-c-minor-guitar-chord)
-Learn How to Play the C Chord